{html.escape(json.dumps(response))}
# -*- coding: utf-8 -*-
"""Copie de how-to-finetune-florence-2-on-detection-dataset.ipynb
Automatically generated by Colab.
Original file is located at
https://colab.research.google.com/drive/18qsKftHOerncsAk2npn34m5EboAalF-t
https://colab.research.google.com/github/roboflow-ai/notebooks/blob/main/notebooks/how-to-finetune-florence-2-on-detection-dataset.ipynb?ref=blog.roboflow.com
[](https://github.com/roboflow/notebooks)
# Fine-tuning Florence-2 on Object Detection Dataset
---
[](https://blog.roboflow.com/florence-2/)
[](https://arxiv.org/abs/2311.06242)
Florence-2 is a lightweight vision-language model open-sourced by Microsoft under the MIT license. The model demonstrates strong zero-shot and fine-tuning capabilities across tasks such as captioning, object detection, grounding, and segmentation.
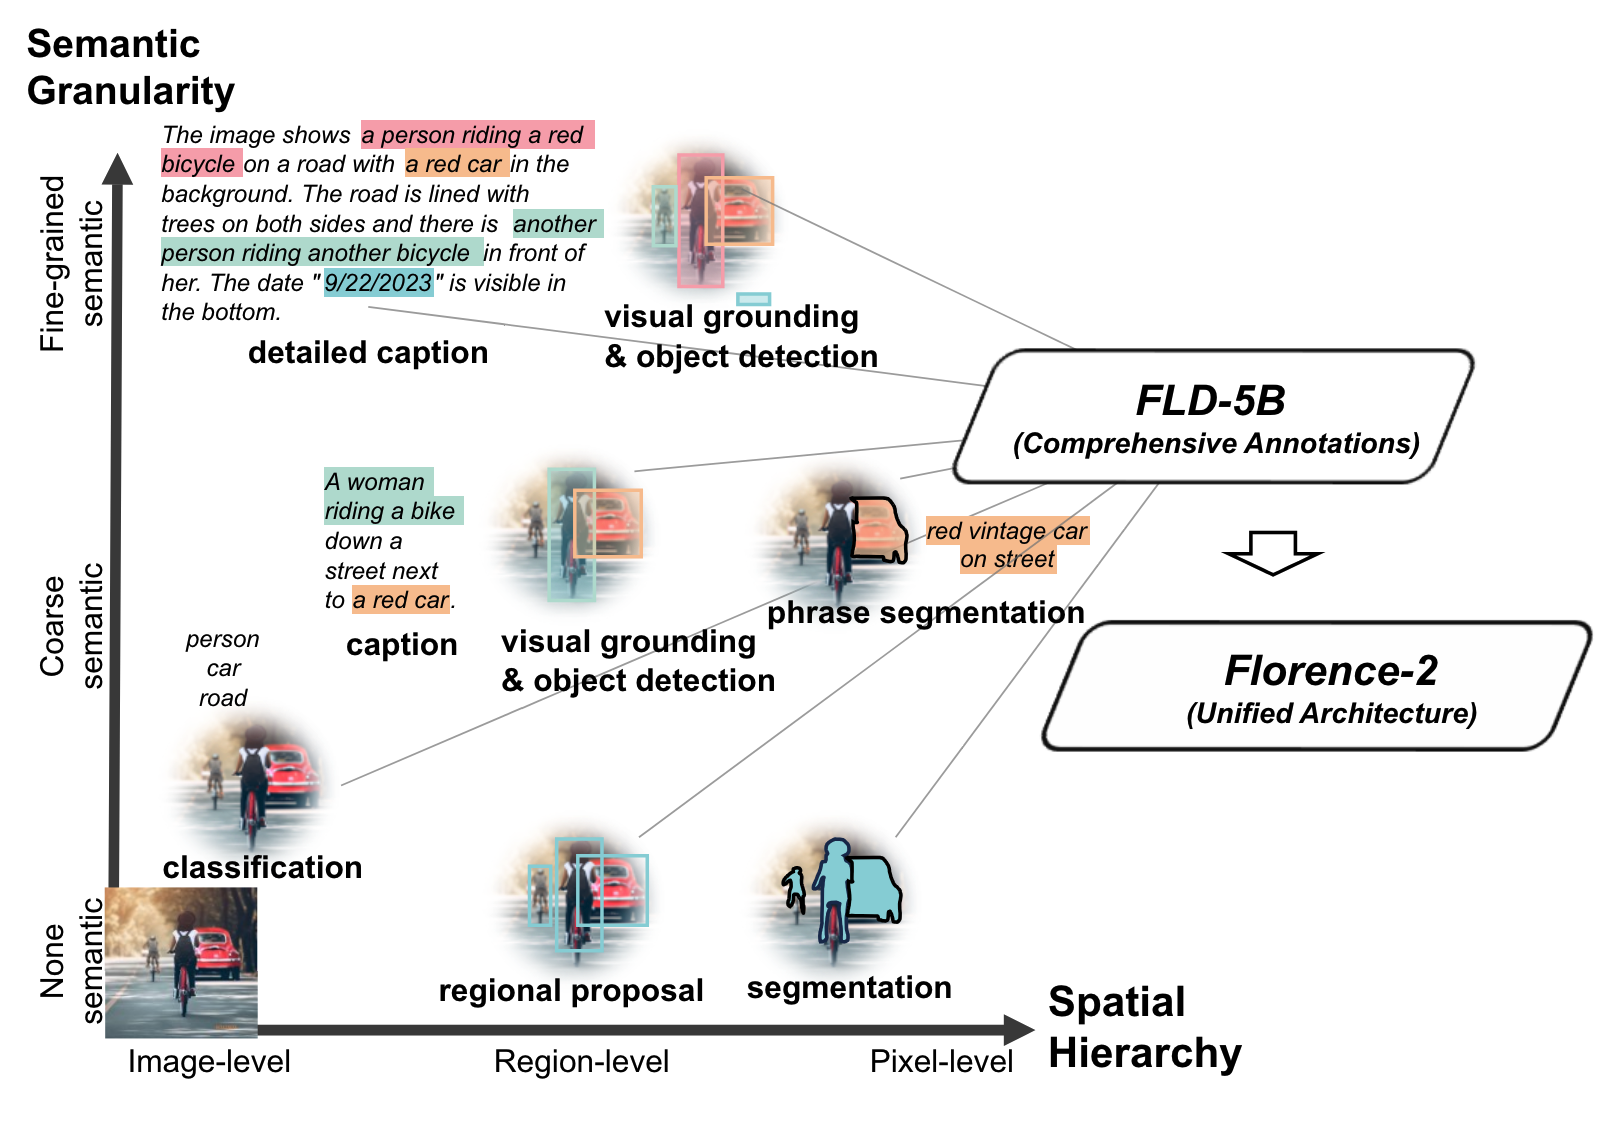
*Figure 1. Illustration showing the level of spatial hierarchy and semantic granularity expressed by each task. Source: Florence-2: Advancing a Unified Representation for a Variety of Vision Tasks.*
The model takes images and task prompts as input, generating the desired results in text format. It uses a DaViT vision encoder to convert images into visual token embeddings. These are then concatenated with BERT-generated text embeddings and processed by a transformer-based multi-modal encoder-decoder to generate the response.
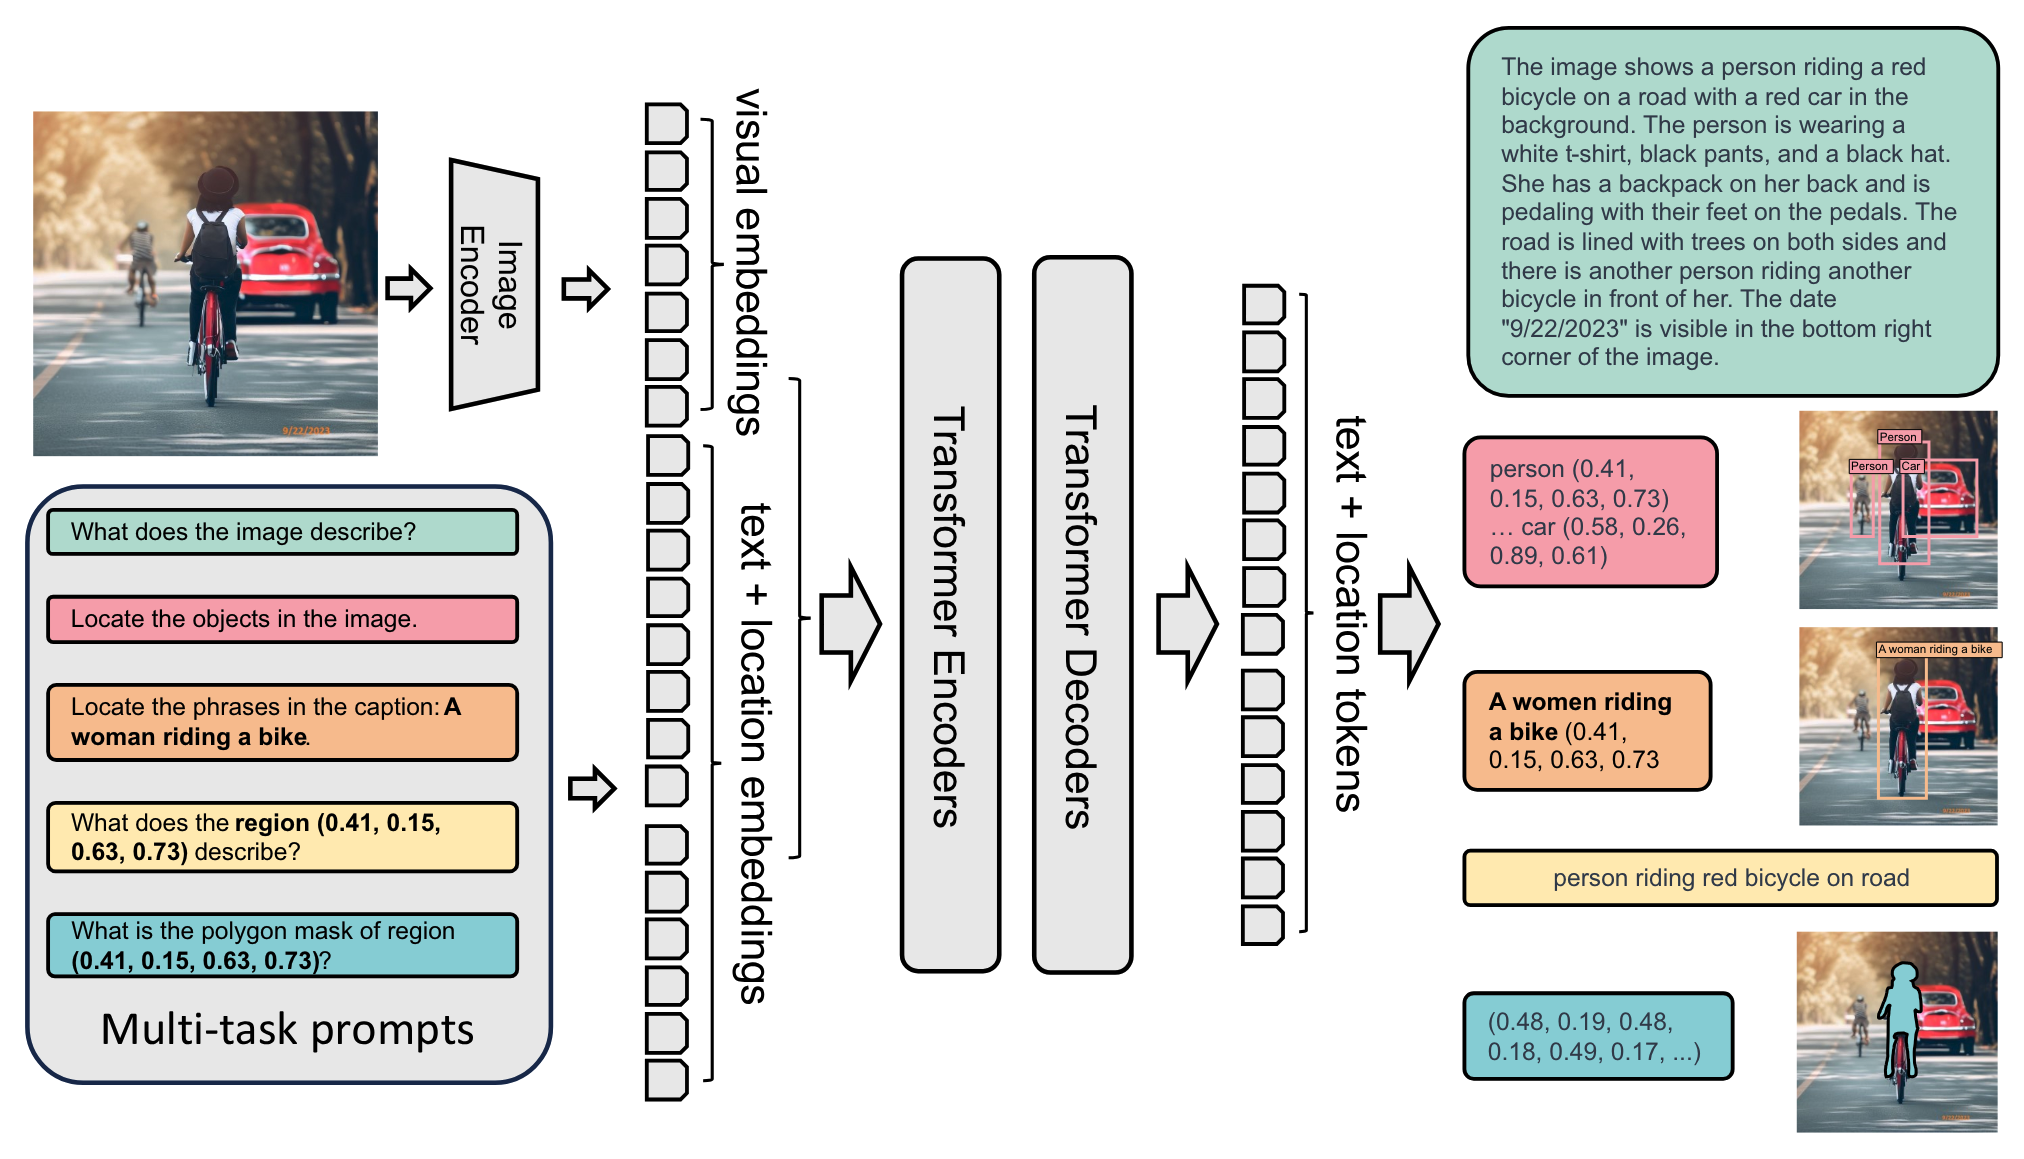
*Figure 2. Overview of Florence-2 architecture. Source: Florence-2: Advancing a Unified Representation for a Variety of Vision Tasks.*
## Setup
### Configure your API keys
To fine-tune Florence-2, you need to provide your HuggingFace Token and Roboflow API key. Follow these steps:
- Open your [`HuggingFace Settings`](https://huggingface.co/settings) page. Click `Access Tokens` then `New Token` to generate new token.
- Go to your [`Roboflow Settings`](https://app.roboflow.com/settings/api) page. Click `Copy`. This will place your private key in the clipboard.
- In Colab, go to the left pane and click on `Secrets` (🔑).
- Store HuggingFace Access Token under the name `HF_TOKEN`.
- Store Roboflow API Key under the name `ROBOFLOW_API_KEY`.
### Select the runtime
Let's make sure that we have access to GPU. We can use `nvidia-smi` command to do that. In case of any problems navigate to `Edit` -> `Notebook settings` -> `Hardware accelerator`, set it to `L4 GPU`, and then click `Save`.
"""
!nvidia-smi
"""### Download example data
**NOTE:** Feel free to replace our example image with your own photo.
"""
!wget -q https://media.roboflow.com/notebooks/examples/dog.jpeg
!ls -lh
EXAMPLE_IMAGE_PATH = "dog.jpeg"
"""## Download and configure the model
Let's download the model checkpoint and configure it so that you can fine-tune it later on.
"""
!pip install -q transformers flash_attn timm einops peft
!pip install -q roboflow git+https://github.com/roboflow/supervision.git
# @title Imports
import io
import os
import re
import json
import torch
import html
import base64
import itertools
import numpy as np
import supervision as sv
from google.colab import userdata
from IPython.core.display import display, HTML
from torch.utils.data import Dataset, DataLoader
from transformers import (
AdamW,
AutoModelForCausalLM,
AutoProcessor,
get_scheduler
)
from tqdm import tqdm
from typing import List, Dict, Any, Tuple, Generator
from peft import LoraConfig, get_peft_model
from PIL import Image
from roboflow import Roboflow
"""Load the model using `AutoModelForCausalLM` and the processor using `AutoProcessor` classes from the transformers library. Note that you need to pass `trust_remote_code` as `True` since this model is not a standard transformers model."""
CHECKPOINT = "microsoft/Florence-2-base-ft"
REVISION = 'refs/pr/6'
DEVICE = torch.device("cuda" if torch.cuda.is_available() else "cpu")
model = AutoModelForCausalLM.from_pretrained(CHECKPOINT, trust_remote_code=True, revision=REVISION).to(DEVICE)
processor = AutoProcessor.from_pretrained(CHECKPOINT, trust_remote_code=True, revision=REVISION)
"""## Run inference with pre-trained Florence-2 model"""
# @title Example object detection inference
image = Image.open(EXAMPLE_IMAGE_PATH)
task = ""
text = ""
inputs = processor(text=text, images=image, return_tensors="pt").to(DEVICE)
generated_ids = model.generate(
input_ids=inputs["input_ids"],
pixel_values=inputs["pixel_values"],
max_new_tokens=1024,
num_beams=3
)
generated_text = processor.batch_decode(generated_ids, skip_special_tokens=False)[0]
response = processor.post_process_generation(generated_text, task=task, image_size=(image.width, image.height))
detections = sv.Detections.from_lmm(sv.LMM.FLORENCE_2, response, resolution_wh=image.size)
bounding_box_annotator = sv.BoundingBoxAnnotator(color_lookup=sv.ColorLookup.INDEX)
label_annotator = sv.LabelAnnotator(color_lookup=sv.ColorLookup.INDEX)
image = bounding_box_annotator.annotate(image, detections)
image = label_annotator.annotate(image, detections)
image.thumbnail((600, 600))
image
# @title Example image captioning inference
image = Image.open(EXAMPLE_IMAGE_PATH)
task = ""
text = ""
inputs = processor(text=text, images=image, return_tensors="pt").to(DEVICE)
generated_ids = model.generate(
input_ids=inputs["input_ids"],
pixel_values=inputs["pixel_values"],
max_new_tokens=1024,
num_beams=3
)
generated_text = processor.batch_decode(generated_ids, skip_special_tokens=False)[0]
response = processor.post_process_generation(generated_text, task=task, image_size=(image.width, image.height))
response
# @title Example caption to phrase grounding inference
image = Image.open(EXAMPLE_IMAGE_PATH)
task = ""
text = " In this image we can see a person wearing a bag and holding a dog. In the background there are buildings, poles and sky with clouds."
inputs = processor(text=text, images=image, return_tensors="pt").to(DEVICE)
generated_ids = model.generate(
input_ids=inputs["input_ids"],
pixel_values=inputs["pixel_values"],
max_new_tokens=1024,
num_beams=3
)
generated_text = processor.batch_decode(generated_ids, skip_special_tokens=False)[0]
response = processor.post_process_generation(generated_text, task=task, image_size=(image.width, image.height))
detections = sv.Detections.from_lmm(sv.LMM.FLORENCE_2, response, resolution_wh=image.size)
bounding_box_annotator = sv.BoundingBoxAnnotator(color_lookup=sv.ColorLookup.INDEX)
label_annotator = sv.LabelAnnotator(color_lookup=sv.ColorLookup.INDEX)
image = bounding_box_annotator.annotate(image, detections)
image = label_annotator.annotate(image, detections)
image.thumbnail((600, 600))
image
"""## Fine-tune Florence-2 on custom dataset
### Download dataset from Roboflow Universe
"""
ROBOFLOW_API_KEY = userdata.get('ROBOFLOW_API_KEY')
rf = Roboflow(api_key=ROBOFLOW_API_KEY)
project = rf.workspace("roboflow-jvuqo").project("poker-cards-fmjio")
version = project.version(4)
dataset = version.download("florence2-od")
!head -n 5 {dataset.location}/train/annotations.jsonl
# @title Define `DetectionsDataset` class
class JSONLDataset:
def __init__(self, jsonl_file_path: str, image_directory_path: str):
self.jsonl_file_path = jsonl_file_path
self.image_directory_path = image_directory_path
self.entries = self._load_entries()
def _load_entries(self) -> List[Dict[str, Any]]:
entries = []
with open(self.jsonl_file_path, 'r') as file:
for line in file:
data = json.loads(line)
entries.append(data)
return entries
def __len__(self) -> int:
return len(self.entries)
def __getitem__(self, idx: int) -> Tuple[Image.Image, Dict[str, Any]]:
if idx < 0 or idx >= len(self.entries):
raise IndexError("Index out of range")
entry = self.entries[idx]
image_path = os.path.join(self.image_directory_path, entry['image'])
try:
image = Image.open(image_path)
return (image, entry)
except FileNotFoundError:
raise FileNotFoundError(f"Image file {image_path} not found.")
class DetectionDataset(Dataset):
def __init__(self, jsonl_file_path: str, image_directory_path: str):
self.dataset = JSONLDataset(jsonl_file_path, image_directory_path)
def __len__(self):
return len(self.dataset)
def __getitem__(self, idx):
image, data = self.dataset[idx]
prefix = data['prefix']
suffix = data['suffix']
return prefix, suffix, image
# @title Initiate `DetectionsDataset` and `DataLoader` for train and validation subsets
BATCH_SIZE = 6
NUM_WORKERS = 0
def collate_fn(batch):
questions, answers, images = zip(*batch)
inputs = processor(text=list(questions), images=list(images), return_tensors="pt", padding=True).to(DEVICE)
return inputs, answers
train_dataset = DetectionDataset(
jsonl_file_path = f"{dataset.location}/train/annotations.jsonl",
image_directory_path = f"{dataset.location}/train/"
)
val_dataset = DetectionDataset(
jsonl_file_path = f"{dataset.location}/valid/annotations.jsonl",
image_directory_path = f"{dataset.location}/valid/"
)
train_loader = DataLoader(train_dataset, batch_size=BATCH_SIZE, collate_fn=collate_fn, num_workers=NUM_WORKERS, shuffle=True)
val_loader = DataLoader(val_dataset, batch_size=BATCH_SIZE, collate_fn=collate_fn, num_workers=NUM_WORKERS)
# @title Setup LoRA Florence-2 model
config = LoraConfig(
r=8,
lora_alpha=8,
target_modules=["q_proj", "o_proj", "k_proj", "v_proj", "linear", "Conv2d", "lm_head", "fc2"],
task_type="CAUSAL_LM",
lora_dropout=0.05,
bias="none",
inference_mode=False,
use_rslora=True,
init_lora_weights="gaussian",
revision=REVISION
)
peft_model = get_peft_model(model, config)
peft_model.print_trainable_parameters()
torch.cuda.empty_cache()
# @title Run inference with pre-trained Florence-2 model on validation dataset
def render_inline(image: Image.Image, resize=(128, 128)):
"""Convert image into inline html."""
image.resize(resize)
with io.BytesIO() as buffer:
image.save(buffer, format='jpeg')
image_b64 = str(base64.b64encode(buffer.getvalue()), "utf-8")
return f"data:image/jpeg;base64,{image_b64}"
def render_example(image: Image.Image, response):
try:
detections = sv.Detections.from_lmm(sv.LMM.FLORENCE_2, response, resolution_wh=image.size)
image = sv.BoundingBoxAnnotator(color_lookup=sv.ColorLookup.INDEX).annotate(image.copy(), detections)
image = sv.LabelAnnotator(color_lookup=sv.ColorLookup.INDEX).annotate(image, detections)
except:
print('failed to redner model response')
return f"""
)})
{html.escape(json.dumps(response))}
"""
def render_inference_results(model, dataset: DetectionDataset, count: int):
html_out = ""
count = min(count, len(dataset))
for i in range(count):
image, data = dataset.dataset[i]
prefix = data['prefix']
suffix = data['suffix']
inputs = processor(text=prefix, images=image, return_tensors="pt").to(DEVICE)
generated_ids = model.generate(
input_ids=inputs["input_ids"],
pixel_values=inputs["pixel_values"],
max_new_tokens=1024,
num_beams=3
)
generated_text = processor.batch_decode(generated_ids, skip_special_tokens=False)[0]
answer = processor.post_process_generation(generated_text, task='', image_size=image.size)
html_out += render_example(image, answer)
display(HTML(html_out))
render_inference_results(peft_model, val_dataset, 4)
"""## Fine-tune Florence-2 on custom object detection dataset"""
# @title Define train loop
def train_model(train_loader, val_loader, model, processor, epochs=10, lr=1e-6):
optimizer = AdamW(model.parameters(), lr=lr)
num_training_steps = epochs * len(train_loader)
lr_scheduler = get_scheduler(
name="linear",
optimizer=optimizer,
num_warmup_steps=0,
num_training_steps=num_training_steps,
)
render_inference_results(peft_model, val_loader.dataset, 6)
for epoch in range(epochs):
model.train()
train_loss = 0
for inputs, answers in tqdm(train_loader, desc=f"Training Epoch {epoch + 1}/{epochs}"):
input_ids = inputs["input_ids"]
pixel_values = inputs["pixel_values"]
labels = processor.tokenizer(
text=answers,
return_tensors="pt",
padding=True,
return_token_type_ids=False
).input_ids.to(DEVICE)
outputs = model(input_ids=input_ids, pixel_values=pixel_values, labels=labels)
loss = outputs.loss
loss.backward(), optimizer.step(), lr_scheduler.step(), optimizer.zero_grad()
train_loss += loss.item()
avg_train_loss = train_loss / len(train_loader)
print(f"Average Training Loss: {avg_train_loss}")
model.eval()
val_loss = 0
with torch.no_grad():
for inputs, answers in tqdm(val_loader, desc=f"Validation Epoch {epoch + 1}/{epochs}"):
input_ids = inputs["input_ids"]
pixel_values = inputs["pixel_values"]
labels = processor.tokenizer(
text=answers,
return_tensors="pt",
padding=True,
return_token_type_ids=False
).input_ids.to(DEVICE)
outputs = model(input_ids=input_ids, pixel_values=pixel_values, labels=labels)
loss = outputs.loss
val_loss += loss.item()
avg_val_loss = val_loss / len(val_loader)
print(f"Average Validation Loss: {avg_val_loss}")
render_inference_results(peft_model, val_loader.dataset, 6)
output_dir = f"./model_checkpoints/epoch_{epoch+1}"
os.makedirs(output_dir, exist_ok=True)
model.save_pretrained(output_dir)
processor.save_pretrained(output_dir)
# Commented out IPython magic to ensure Python compatibility.
# # @title Run train loop
#
# %%time
#
# EPOCHS = 10
# LR = 5e-6
#
# train_model(train_loader, val_loader, peft_model, processor, epochs=EPOCHS, lr=LR)
"""## Fine-tuned model evaluation"""
# @title Check if the model can still detect objects outside of the custom dataset
image = Image.open(EXAMPLE_IMAGE_PATH)
task = ""
text = ""
inputs = processor(text=text, images=image, return_tensors="pt").to(DEVICE)
generated_ids = peft_model.generate(
input_ids=inputs["input_ids"],
pixel_values=inputs["pixel_values"],
max_new_tokens=1024,
num_beams=3
)
generated_text = processor.batch_decode(generated_ids, skip_special_tokens=False)[0]
response = processor.post_process_generation(generated_text, task=task, image_size=(image.width, image.height))
detections = sv.Detections.from_lmm(sv.LMM.FLORENCE_2, response, resolution_wh=image.size)
bounding_box_annotator = sv.BoundingBoxAnnotator(color_lookup=sv.ColorLookup.INDEX)
label_annotator = sv.LabelAnnotator(color_lookup=sv.ColorLookup.INDEX)
image = bounding_box_annotator.annotate(image, detections)
image = label_annotator.annotate(image, detections)
image.thumbnail((600, 600))
image
"""**NOTE:** It seems that the model can still detect classes that don't belong to our custom dataset."""
# @title Collect predictions
PATTERN = r'([a-zA-Z0-9 ]+ of [a-zA-Z0-9 ]+)'
def extract_classes(dataset: DetectionDataset):
class_set = set()
for i in range(len(dataset.dataset)):
image, data = dataset.dataset[i]
suffix = data["suffix"]
classes = re.findall(PATTERN, suffix)
class_set.update(classes)
return sorted(class_set)
CLASSES = extract_classes(train_dataset)
targets = []
predictions = []
for i in range(len(val_dataset.dataset)):
image, data = val_dataset.dataset[i]
prefix = data['prefix']
suffix = data['suffix']
inputs = processor(text=prefix, images=image, return_tensors="pt").to(DEVICE)
generated_ids = model.generate(
input_ids=inputs["input_ids"],
pixel_values=inputs["pixel_values"],
max_new_tokens=1024,
num_beams=3
)
generated_text = processor.batch_decode(generated_ids, skip_special_tokens=False)[0]
prediction = processor.post_process_generation(generated_text, task='', image_size=image.size)
prediction = sv.Detections.from_lmm(sv.LMM.FLORENCE_2, prediction, resolution_wh=image.size)
prediction = prediction[np.isin(prediction['class_name'], CLASSES)]
prediction.class_id = np.array([CLASSES.index(class_name) for class_name in prediction['class_name']])
prediction.confidence = np.ones(len(prediction))
target = processor.post_process_generation(suffix, task='', image_size=image.size)
target = sv.Detections.from_lmm(sv.LMM.FLORENCE_2, target, resolution_wh=image.size)
target.class_id = np.array([CLASSES.index(class_name) for class_name in target['class_name']])
targets.append(target)
predictions.append(prediction)
# @title Calculate mAP
mean_average_precision = sv.MeanAveragePrecision.from_detections(
predictions=predictions,
targets=targets,
)
print(f"map50_95: {mean_average_precision.map50_95:.2f}")
print(f"map50: {mean_average_precision.map50:.2f}")
print(f"map75: {mean_average_precision.map75:.2f}")
# @title Calculate Confusion Matrix
confusion_matrix = sv.ConfusionMatrix.from_detections(
predictions=predictions,
targets=targets,
classes=CLASSES
)
_ = confusion_matrix.plot()
"""## Save fine-tuned model on hard drive"""
peft_model.save_pretrained("/content/florence2-lora")
processor.save_pretrained("/content/florence2-lora/")
!ls -la /content/florence2-lora/
"""## Upload model to Roboflow (optional)
You can deploy your Florence-2 object detection model on your own hardware (i.e. a cloud GPu server or an NVIDIA Jetson) with Roboflow Inference, an open source computer vision inference server.
To deploy your model, you will need a [free Roboflow account](https://app.roboflow.com).
To get started, [create a new Project in Roboflow](https://docs.roboflow.com/datasets/create-a-project) if you don't already have one. Then, upload the dataset you used to train your model. Then, create a dataset Version, which is a snapshot of your dataset with which your model will be associated in Roboflow.
You can read our full [Deploy Florence-2 with Roboflow](https://blog.roboflow.com/deploy-florence-2-with-roboflow/) guide for step-by-step instructions of these steps.
Once you have trained your model A, you can upload it to Roboflow using the following code:
"""
import roboflow
rf = Roboflow(api_key="API_KEY")
project = rf.workspace("workspace-id").project("project-id")
version = project.version(VERSION)
version.deploy(model_type="florence-2", model_path="/content/florence2-lora")
"""Above, replace:
- API_KEY with your [Roboflow API key](https://docs.roboflow.com/api-reference/authentication#retrieve-an-api-key).
- workspace-id and project-id with your [workspace and project IDs](https://docs.roboflow.com/api-reference/workspace-and-project-ids).
- VERSION with your project version.
If you are not using our notebook, replace /content/florence2-lora with the directory where you saved your model weights.
When you run the code above, the model will be uploaded to Roboflow. It will take a few minutes for the model to be processed before it is ready for use.
Your model will be uploaded to Roboflow.
## Deploy to your hardware
Once your model has been processed, you can download it to any device on which you want to deploy your model. Deployment is supported through Roboflow Inference, our open source computer vision inference server.
Inference can be run as a microservice with Docker, ideal for large deployments where you may need a centralized server on which to run inference, or when you want to run Inference in an isolated container. You can also directly integrate Inference into your project through the Inference Python SDK.
For this guide, we will show how to deploy the model with the Python SDK.
First, install inference:
"""
!pip install inference
"""Then, create a new Python file and add the following code:"""
import os
from inference import get_model
from PIL import Image
import json
lora_model = get_model("model-id/version-id", api_key="KEY")
image = Image.open("containers.png")
response = lora_model.infer(image)
print(response)
"""In the code avove, we load our model, run it on an image, then plot the predictions with the supervision Python package.
When you first run the code, your model weights will be downloaded and cached to your device for subsequent runs. This process may take a few minutes depending on the strength of your internet connection.
# Congratulations
⭐️ If you enjoyed this notebook, [**star the Roboflow Notebooks repo**](https://https://github.com/roboflow/notebooks) (and [**supervision**](https://github.com/roboflow/supervision) while you're at it) and let us know what tutorials you'd like to see us do next. ⭐️
"""